We received a phone call this morning from a long-term reseller, they were onsite updating PaperCut MF to v18 and the customer had asked for some advanced configuration to happen after the upgrade. The customer wanted to have greater control over when held print jobs are deleted if they are not released, so we started to look for ways to create a custom timeout value for PaperCut.
What does that do? Good question…
When print jobs are sent to a secure print queue they are paused until released, after X amount of time they are deleted by PaperCut. PaperCut deletes the jobs for two reasons.
The timeout value will be different between organisations, as every environment is different and each customer has their own needs. The default values upon installation of PaperCut are different depending what option you selected during setup, education is set to two hours and commercial defaults to four hours.
The timeout is configurable at a global level (impacts all print queues), you can change it as you see fit via the PaperCut Admin UI by going to:
Options → General → Hold/Release Queues → Delete held jobs if not released after.
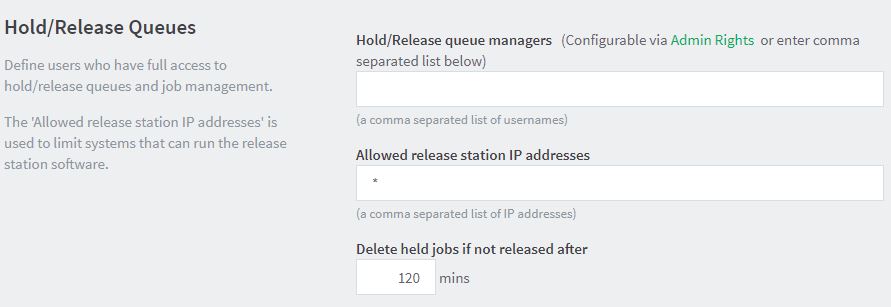
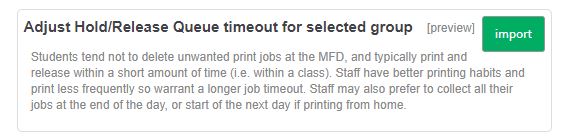
Newer installs of PaperCut have the option to set the timeout per print queue (overriding the global value) by importing one of the easy to use print script recipes and editing the timeout variable in the script as you see fit.
Given that there is a print script option to set the hold/release timeout
actions.job.setHoldReleaseTimeout()
we have greater freedom over the timeout value. Back to the customer…
They currently have a timeout value of twelve hours, this suits them for the majority of printing they perform. As their print facilities are open seven days a week they needed some special rules put in. They wanted users printing last thing on a Friday able to pick up their documents the following week, the same for Saturday and Sunday, if they sent a print on the weekend it needed to be available Monday. The current twelve hour timeout value would delete any of these jobs before users had a chance to get at them on Monday. The way around this is to be able to set a custom timeout based on the day (and even the time of day). The thinking behind the script is to keep jobs for 4 days for any print jobs sent on a Friday, 3 days for Saturday, 2 for Sunday and so on.
The script assumes that Sunday is day 0 (the start of the week) and Saturday day 6 (the end of the week). To help administrators, any jobs sent also have a comment logged against them that explains they had an extended timeout.
The script performs these actions from 6pm on Friday until 8am Monday morning.
Feel free to give the script a go, the important bits to edit are:
actions.job.setHoldReleaseTimeout (2 * _dayMinutes) ;
– The dayMinutes value is 1440 (number of minutes in a day). in this example, we keep the job for 2 x 1440 minutes.
actions.job.addComment("Job timeout set to 2 days");
– This is the optional job comment, feel free to remove this line if it is not required.
To adjust the time, look for if “(_hour < 8” or “if (_hour > 18”, this is very simple and means < before or after > certain times. You can remove these if you need it to apply all day.
/*
/*
 	 	* Revised hold/release time for job sent out of hours.
 	 	* 6pm Friday - 8 am Monday - extend by X hours.
 	 	*/
 	 	function printJobHook(inputs, actions) {
 	 	 if (!inputs.job.isAnalysisComplete) { return; }
 	 	 var _today = inputs.job.date.getDay();
 	 	 var _hour = inputs.job.date.getHours();
 	 	 var _dayMinutes = 1440;

 	 	 switch (_today) {
 	 	 // Sunday
 	 	 case 0:
 	 	 actions.job.setHoldReleaseTimeout(2 * _dayMinutes);
 	 	 actions.job.addComment("Job timeout set to 2 days");
 	 	 break;
 	 	 // Monday
 	 	 case 1:
 	 	 if (_hour < 8) { actions.job.setHoldReleaseTimeout(1 * _dayMinutes); actions.job.addComment("Job timeout set to 1 day"); } break; // Friday case 5: if (_hour > 18) {
 	 	 actions.job.setHoldReleaseTimeout(4 * _dayMinutes);
 	 	 actions.job.addComment("Job timeout set to 4 days");
 	 	 }
 	 	 break;
 	 	 // Saturday
 	 	 case 6:
 	 	 actions.job.setHoldReleaseTimeout(3 * _dayMinutes);
 	 	 actions.job.addComment("Job timeout set to 3 days");
 	 	 break;
 	 	 }

 	 	}
When picking a timeout value it is well worth considering the following:
The default values will suit a lot of sites, if you do plan to make changes we recommend doing this slowly over time and then see what impact that has had on resources. Or…follow our support teams mantra of using speed and confidence and set it to as many 9’s as you can fit in the box and cross your fingers.
If you have your own requirements for a print script and you don’t have the time or in-house experience to make it then simply contact us.

The title of the job role speaks for itself. Ross runs around putting out fires and exhorting the rest of the team to “move faster”. He is often accused of sticking his nose where it is not wanted…
 info@selectec.com